Showing posts with label Rogue Rabbit. Show all posts

Saturday, March 8, 2014

Working with Chance - Shifted Perspective

After thinking about what we have been discussing indeterminacy and working in chance in my conceptual strategies class, I decided to apply it to my independent studies class as well.

In 3D printing, a lot of variables are left to chance. There is no guarantee that your print will be successful. If you print the same object 1,000 times, there are any number of things that will effect the outcome. Ambient temperature, material, hot end temperatures, computer issues, hardware issues, and more can change the outcome of your print.

Case in point:


This is an 18 gallon tote filled with failed prints (going back about a year - there are more that have been thrown away or are in other boxes as well). Some failed due to equipment failure. Some failed due to material failure. Some of them we have no clue as to why they failed. 

This box is intended to be run through a "filabot" style machine to reclaim the expended filament. Mind-2-Matter and LaserGnomes try to be as green as possible, so reclaiming spent filament is inline with our  business plans. I figured in the meantime, I could do a bit of reclamation myself. 

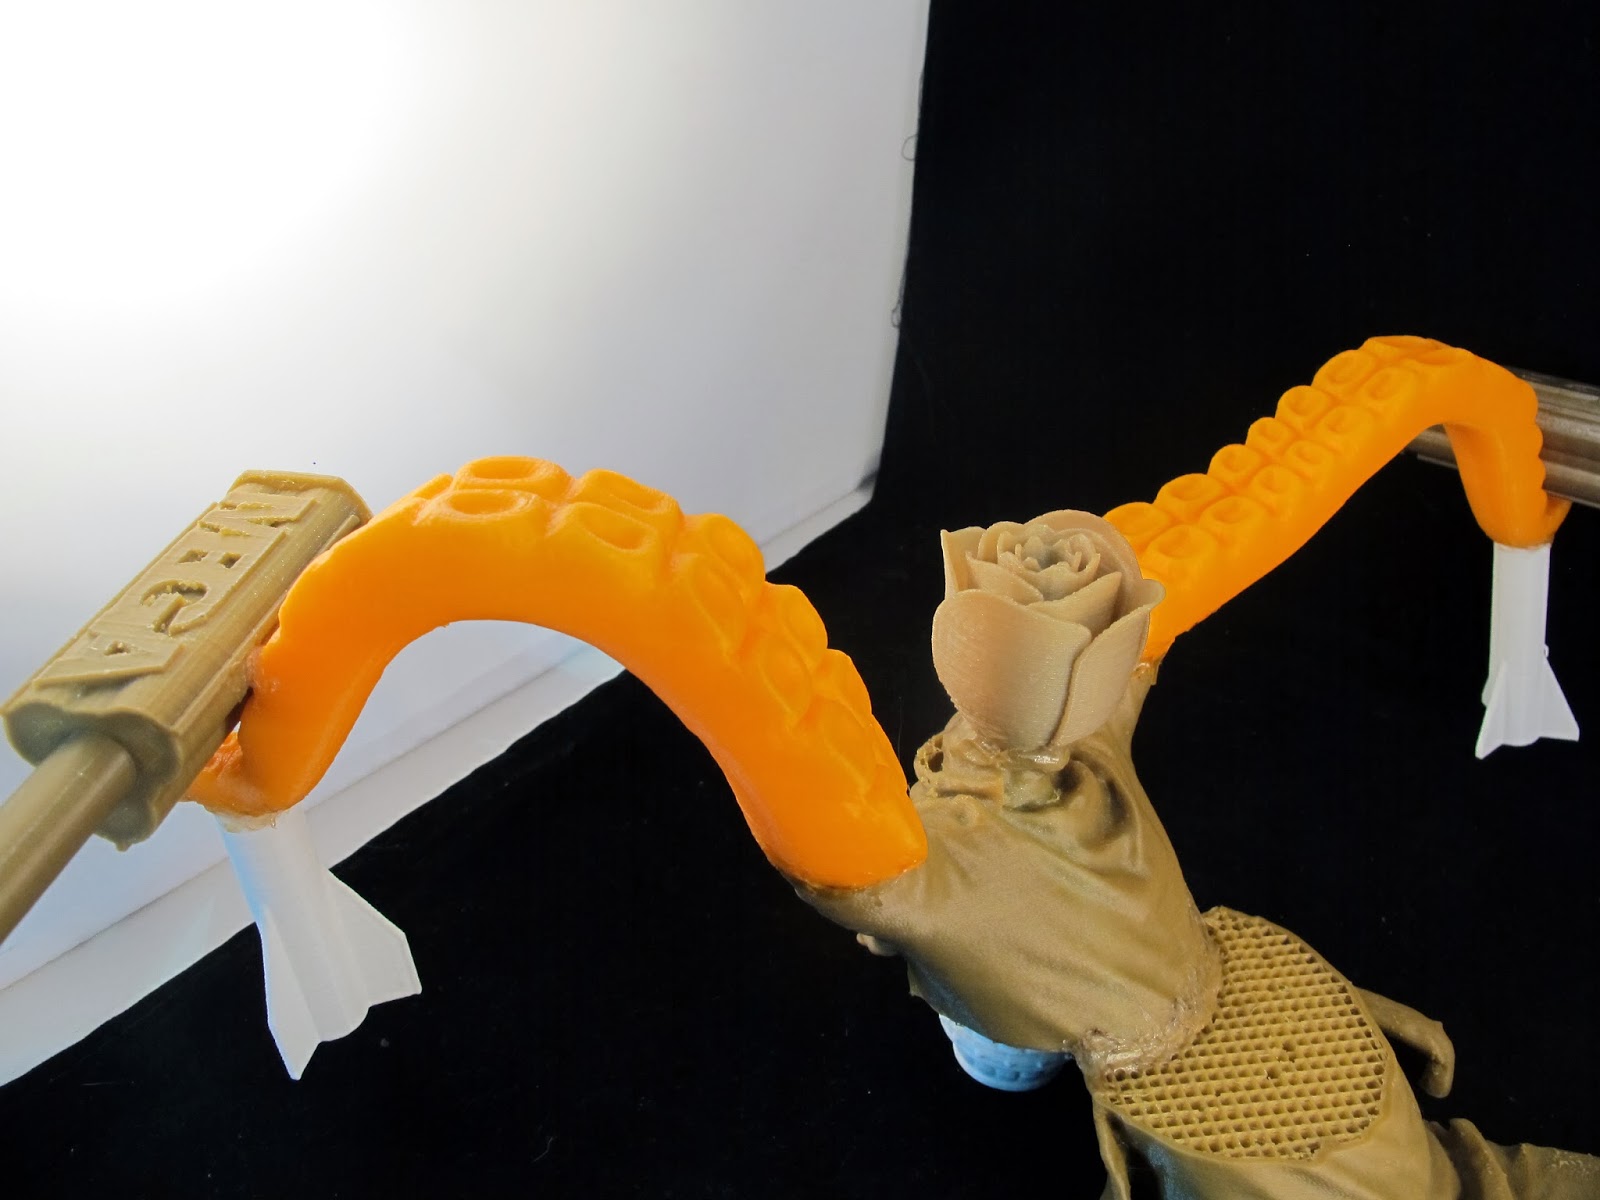
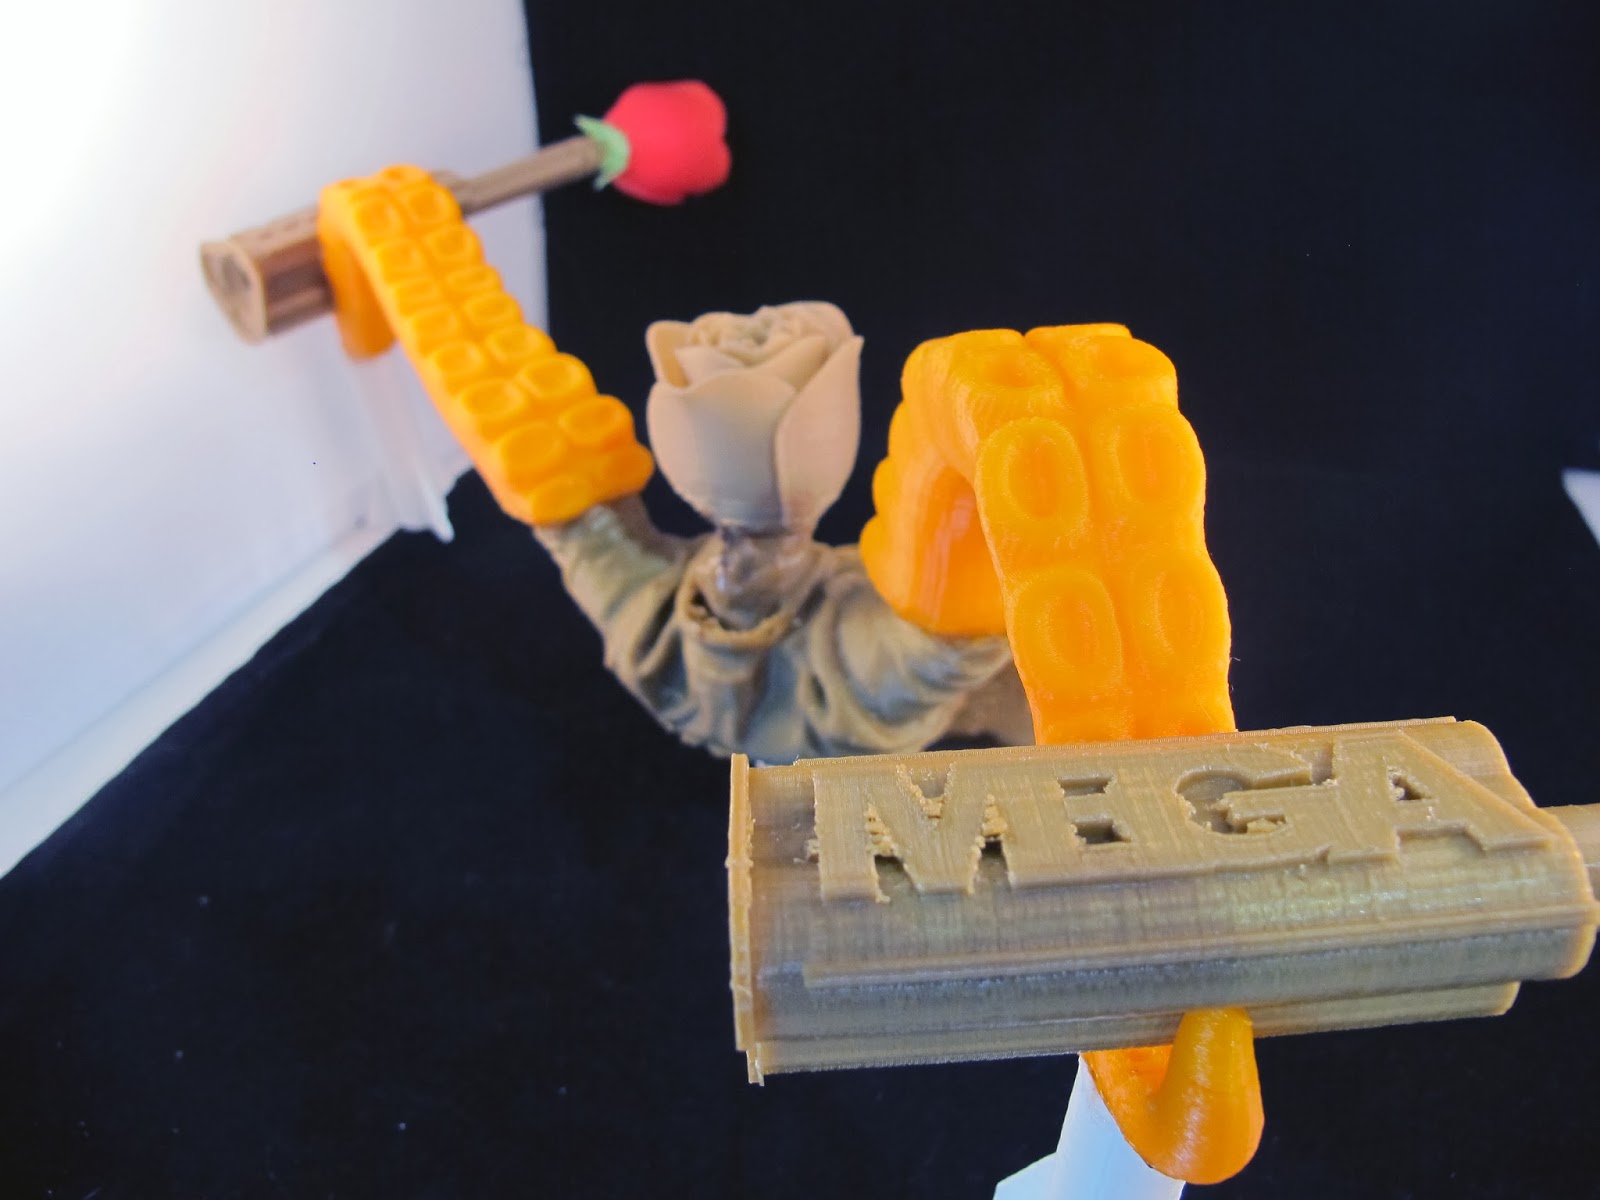
I spent some time digging through the box to create a sculpture from failed and discarded prints. Since we design and print a myriad of things from engineering parts to organic shapes, it was an interesting melange of components to choose from. 

We had a number of MegaFire and SlugFire shells that failed for various reasons or were made prior to additional revisions that lead to our finished retail ready products for NERF blasters.  We also had a number of failed flowers from another project that we undertook for Valentines Day. 

Obviously it's time to get a larger photo tent :)

Shifted Perspective

Shifted Perspective

Shifted Perspective


Tuesday, February 4, 2014

Hot Trend: Brass, Bronze and Gold Finishes

And we at Mind-2-Matter, know a thing or two about brass.

Currently we are casting brass and pewter with little to no problems. We've also tackled bronze as well!

Brass Impeller

Bronze "Lazard" by Justin Kelly
Brass, bronze and gold tone finishes are all the rage in decorating right now (in moderation I can understand, but it sort of reminds me of the Golden Girls and the 1980's horrid bathroom fixtures when overdone). 

The resurgence in popularity apparently has been building since early 2013. I know that when a former employer would offer vintage brass pieces, they'd sell out almost instantly, but I didn't realize how far reaching it was. House Beautiful called it out in December 2012, Apartment Therapy was singing its praises in 2013 and it seems like the love of brass is still going strong, especially at New House New Home

There is certainly a nostalgic bent about brass and bronze. Brass always makes me think of my grandpa. One of his favorite pastimes before his hands got too bad was going to the thrift store and restoring brass pieces. 

The Brass Minimal Surface Cube (above) is an awesome example of what Mind-2-Matter can do. This form is based on theoretical mathematical principles that would be near impossible to bring to reality without 3D printing. Using traditional milling methods, it would be impossible to generate this object in brass, bronze or any other metal. We've developed a technique that has made it a reality. 

The Bronze "Lazard" is another example of bringing digital assets to life. It was originally created as a model for a class Justin took and it's been brought to life using 3D printing. We've then used our process to cast in bronze. This is an amazing took for digital modelers who may want to create a physical object from their digital assets!. 

Got an idea? Contact us. We can help you bring your ideas from mind to metal :)

Friday, January 31, 2014

Superstorm School!

It's been a hectic week. School started on Monday and I have classes Tuesday, Wednesday and Thursday.

I have discovered a perk of NOT attending a private school: flat rate tuition. I am taking 18 units (well, 15 until my independent studies section is approved) for the price of 6.1-12 units.

Say what?

At AAU, the same number of units would run about $14k.

I have also crashed my first class, ever. In all my years of college, I've never had such restrictive enrollment. Typically I just enroll like the first day enrollment opens (community college and AAU worked this way). This time around it was tiered enrollment. I could enroll in up to 7 units at orientation, then I had to wait a month to enroll in up to 15. Then a week after that I could enroll in up to 19.

Unfortunately, every single class I wanted was full by the time my enrollment time for the second round came up. I had just checked class enrollment levels half an hour prior to my enrollment time. I logged in at 1 minute to 5 and by the time I entered the class numbers, all of my classes were full.

Eventually I got enrolled in some classes. Some that I really didn't want but I had the units. One of the classes had an instructor that was half an hour late, swayed back and forth and had voice modulation issues. I had a severe case of motion sickness by the end of class. Here's a sample of what I sat through.


The next night I saw that there were 5 seats open in the Gerontology class I really wanted. I made the bold choice to try to crash that class even though I had another class at the same time. Well, apparently everyone else had the same idea. There were 65 seats in the class. The instructor had already given 8 add codes out and was capping enrollment at 75 students. A total of 90 people showed up. I was totally making myself sick with trying to decide to sit it out and see what happened (hoping a bunch of people really didn't want to study death and end of life issues) or run over to the gym to the class I was actually enrolled in.

I stayed. And so did 15 other people. It came down to putting names in a box and randomly selecting 3 people. Thank Jebus I was the first name drawn! I was so worried I skipped the first class of leisure and recreation for nothing.

As far as my independent studies class goes, it is going to basically be artistic reproduction using new and emerging technologies. I will do 4 projects (from creating the artwork in physical or digital representation reproducing those works using various methods incorporating technology) and write a final paper. I'm super excited about this. This means I get school credit for stuff I would normally be doing 4 days a week anyway (with my school schedule, there's no real way I can go to the Gnomery on Tuesday, Wednesday or Thursday).

I am also fairly stoked on my textiles class. Textiles? Yeah. After discussing with the department chair my ultimate goals, we came to the conclusion that textiles would be a great place to focus my energies. People are intimidated by fine art. If you aren't an artist, you aren't really going to feel comfortable painting a picture or drawing or sculpting. But people are far less intimidated by crafts. I'm learning hand sewing, crocheting, embroidery and the like. These are skills that are far less intimidating to most people.

Not quite underwater basket weaving. Maybe that's a more advanced class.


Tuesday, January 21, 2014

Matter Control Set Up

Okay, I didn't get the video done this morning. But I had a good reason. I had to go over to City Hall in San Leandro and get Mind-2-Matter's business license! I've been trying for a couple of weeks to get over there, but the planning department has wonky hours. They work a full day Monday and 8-12 Tuesday through Thursday and are closed on Fridays. Yesterday was a holiday (and last week I don't think I ended up in San Leandro during business hours), so I got it taken care of today.

I did get some screen captures done of the set up for Matter Control today. I haven't had a chance to run anything yet (there are never enough printers because we're so busy!), but set up is super easy.

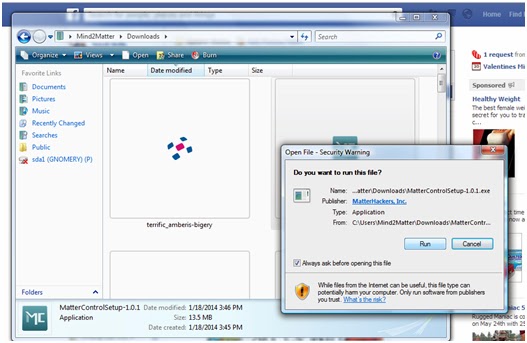
The usual - download the file and run it. 

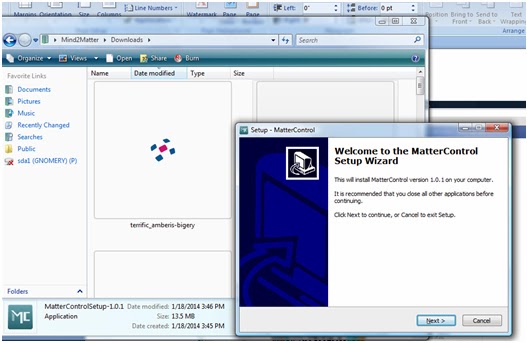
Follow the Setup Wizard (I'm pretty sure you don't need a play by play of this step)
I'm jumping ahead to opening the program in the next step so don't think you missed anything. 
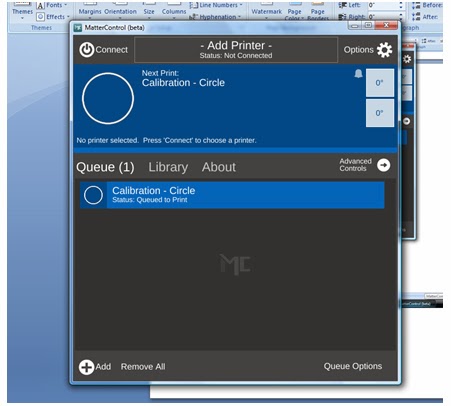
This is the default screen when you open it for the first time. 
This is where you will set up your printer (and where I found out about the Airwolf printers. I want to get my hands on one so I can see if it lives up to such a badass name).

Click on the center where it says "add printer".


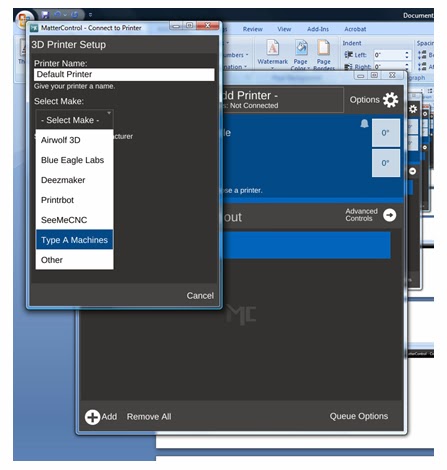
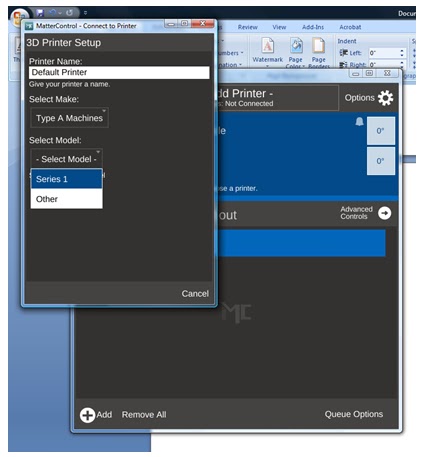
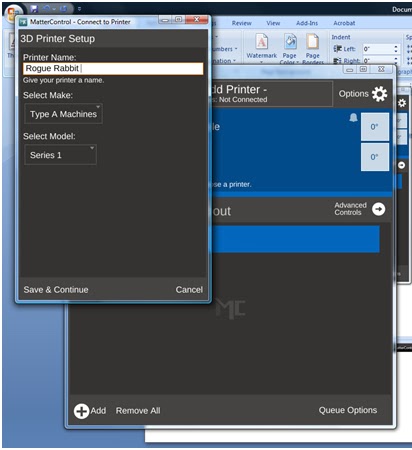
In this screen you can name your printer (really helpful when you have a wall full of printers to try to keep straight) and you are able to select your make and model of printer (which will lead you to the right drivers to install).

They are listed in alphabetical order, but look there's the Airwolf!
Really though, if you want dependability, go with the Type A Machines - We're running 5 right now!
Select your model - We've got the Series 1. 
And choose a name. Obviously - Rogue Rabbit is an appropriate name.
Maybe when we get the Tantillus printers up and running, I will make one named Rogue Rabbit. 
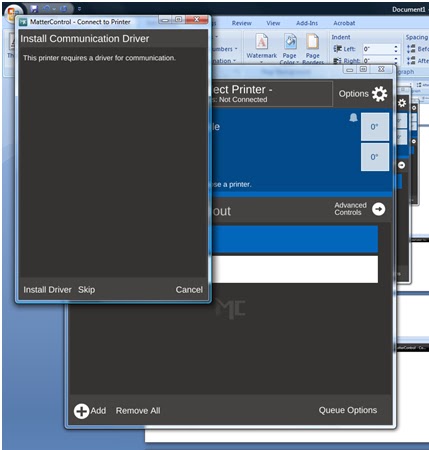
Install your drivers. 
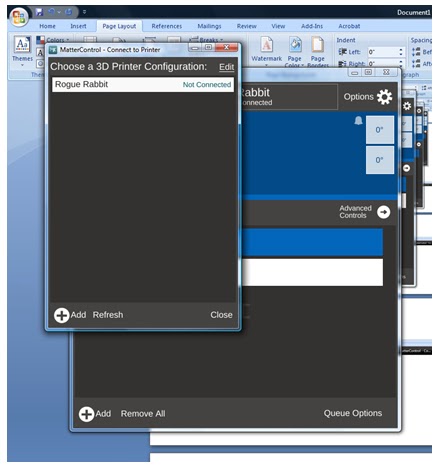
After installing drivers and testing communication, you are ready to choose your printer. 
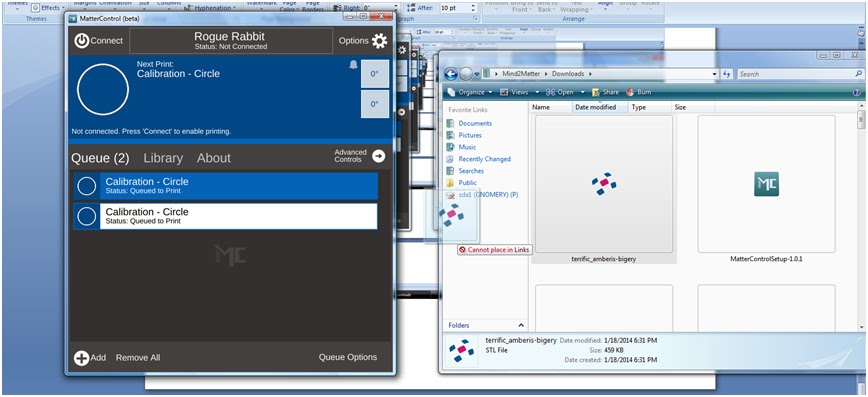
Here's one of the cool parts - Drag and drop file queuing. I've downloaded one of my models from TinkerCAD,
and just dragged it over to my queue.

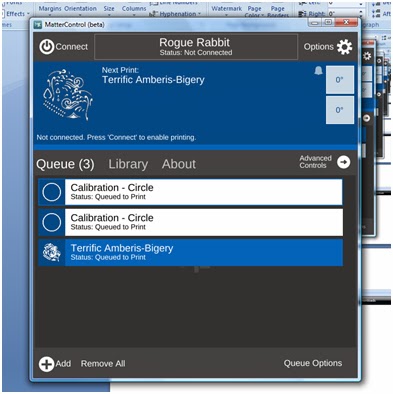
And here's my file added to the queue. 
I'll try to get my hands on a printer tomorrow to run a print job.

Like I've said, I'm a total novice when it comes to printing. Justin has ALL the printing skillz because he's seriously spent like the entire last year with the printer. He knows the ins and outs better than anyone does of the Type A Machines Series 1. He also knows the hassles of other printer controllers.

I'll play with it and ask his opinion on it as an "expert".

BTW, added a few new pieces of art to our Society6 page, including this awesomeness! I don't even like throw pillows, but I would order one.


Sunday, December 15, 2013

So much to do!

And so little time!

We went to check out the new facility in San Leandro today, which is BEYOND exciting!

I'm trying to figure out school for next semester, which is sort of frustrating. SFSU still hasn't requested transcripts, so I'm not entirely certain what is transferrable from AAU. I know what transferred from Los Rios Community College, so that helps a bit, but some of the core classes I have no idea if I actually need to take them or not. 

I'm going to go down to campus tomorrow to pay tuition and see if I can get together with an adviser or at least someone in admissions/records to help me out. I have a rough plan, but I'd rather have it taken care of so it's one less thing to worry about.

With checking out our new space today, it's really coming at us fast. It's exciting and scary at the same time.

I have orientation for school on Saturday, but I would like to have an idea of what my schedule will be like so I can figure out where/when I can be of use when we start kicking into gear. I'm a planner a lot of the time. I like to have an idea what is going on.

I usually have classes registered for the second they are available, but my lack of readily available immunization records prevented that. I'm 34. It's not easy finding records from shots I got when I was like 7. My pediatrician went out of business ages ago.

Instead, I had to pay $100 to have a blood test performed to prove I had my MMR vaccine like 27 years ago. That meant I risked having the results come back showing that I have no immunity. Which would have meant get the immunization (again, pricey on top of the test I just paid for) or find a doctor that would write me an exemption.

Thank Jeebus it came back that I have immunity. One less worry (I was concerned about finding a doc that would give me an exemption!). I have the Hep series from when I was a firefighter and I did get a TDAP in 2009.

I'm still working on the 3d modeling software trials.

It's FRUSTRATING! Good god, I don't know how Justin made into 3d modeling! All I can think of every time I start up the program is "holy crap, I could grab a block of clay and have this done in 10 minutes and then scan it!"

That was what I did for the Rufio costume and it worked out well. But I'm super determined to learn how to model. Especially when I see the possibilities for what I want to do design-wise.

I've got finals tomorrow and Tuesday. I've got Orientation on Saturday. Le Midge's birthday is next Tuesday. Christmas is next Wednesday.

We've got people asking about our New Years plans. We have barely even thought about Christmas, aside from sweet, delicious tri tip at my mom's.

Thursday, December 12, 2013

3D Sculpting Software - Curvy 3D - Day 2

I'm still playing around with Curvy3D. I am going to work with Justin to try to come up with good evaluation tools from his standpoint (i.e., how the models will work for printing, etc.) to try to evaluate if the program works for our overarching needs, not just my desire to make organic shapes (really, what good is the model going to be if it doesn't print?!).

The other project I was working on was the Rufio costume for a friend. A friend approached me yesterday afternoon with the need for a Rufio costume for a party that started at 4 pm today! 

Not sure who Rufio is? A character from 1991's Hook. A bit random, right? Especially for a Christmas party. 


Here's the result:


I altered the jacket and made the necklace, including the beads. 

Not bad for such a quick turnaround. 

So with that taking up a bit of time (but amazingly not as much as I expected), I played around with Curvy3D. 

Keep in mind, my area of design is 2D. I'm great with Illustrator, Photoshop, etc. I have the hang of TinkerCAD as far as 3D goes, but I am, by no means experienced in 3D modeling. I have played a bit with Inventor (Autodesk) and AutoCAD (Autodesk). 

I really want a program that I can pick up my stylus and "draw". I played a bit with Sculptris but didn't really "get it" super quick (I will return to it after playing with Curvy3D). 

Here's my first attempt at really playing around with it doing more than just "what does this icon do?"

As you can see, I watch a lot of Ancient Aliens
Is this what our alien overlords will look like?


So this was created using some basic tools including "Create Cylinder", "Pull Tubes", "Add", "Sub" and "Smooth". 

I didn't really have a plan and wasn't entirely certain what I was doing, I sort of started "pushing" and "pulling" the clay and playing around with it. 

I've exported it as an .obj file so Justin can evaluate it's usefulness in 3D printing. He's currently working on a 3D printed trailer for a trailer park (the things people want), so I'll probably have a better idea as to the immediate usability of the model tomorrow. 

On an aside, I'm not exactly sure when my entire Pinterest feed began getting flooded with fashion and mens grooming products (pretty sure the grooming products being as hipstery as they are are courtesy of Shoppe Mob). I've got to start following some better boards. 

Any suggestions?

3D Sculpting Software - Curvy 3D

I'm trying to find a 3D modeling software that is relatively easy for a beginner to navigate. 

Everyone knows how much I love TinkerCAD but for a lot of what I want to do, it can't create organic shapes. You can only do so much creating .svgs in Illustrator and importing into TinkerCAD. I can't chamfer or bevel, I can't create fillets. 

I can use Autodesk's Inventor or AutoCAD but I really want to work organically. My other thought was to sculpt everything by hand and use the Sense 3D scanner to create models, but really, I should learn how to model digitally. 

I don't have the education that Justin has (and that is why he has an INTENSE understanding of models) and don't necessarily need to. But I need to be able to create organic designs digitally. I need to be able to do more than extrude an .svg file and print that (really, I could just be using a laser cutter, which is much faster and I could work in a variety of materials for that). 

To truly take advantage of what we are building, I need to model. 

I'm trying a bunch of programs out, either freeware or on trial basis, in the next few weeks to see how I feel about them and try to judge their ease of use. I want to find a program that a novice could play around with and not be frustrated. 

Enter Curvy3D. I'm going to play with it for at least a week. I started playing around with it today, but got a request to help make a Rufio costume by tomorrow. So I took the opportunity to carve some dragon's teeth for a necklace, make a mold and create custom beads for it. We also do some low tech manufacturing here was well. It's not always lasers and PLA :)

Clay "dragon tooth" (left) and inverse mold (right)
The beads are in the oven and will be assembled in the morning. 

Just in case you don't remember Rufio, here's a photo


I didn't really get far enough into Curvy3D start getting into the nitty gritty, but it allows me to start doing what I had planned for in my designs. There is a 30 day free trial (that's how I'm checking it out) and the normal cost is $99.00. It is currently discounted 25% for a sale price of $74.25. That's not bad considering the intense investment most other software entails. 

I plan do to some screen captures and possibly some videos while I'm playing around with it, which I will share here. Some others I am checking out will be Wings3D, Sculptris and Modo. 123D Sculpt (autodesk product) is, unfortunately, iPad only. So that's not going to be in the running.

Tuesday, December 10, 2013

Made In Space!?

We went to a really great 3D printing meet up on Sunday (it's been a busy week with Mind-2-Matter and getting ready for finals next week, so I wasn't timely in blogging about it).

It was hosted by Type A Machines and 3DHubs, who just recently unlocked San Francisco.

3DHubs is another print on demand service that required a certain number of printers to sign up in an area prior to "unlocking" a city. We had been watching for months for San Francisco to be unlocked but have been steadily using MakeXYZ to grow our business.

We spent a bit of time networking and one of the featured speakers was Made in Space!

What's Made in Space you ask?

Basically they are a group that is working on the first 3D printer in space!

How rad is that idea?

I can't say we're working on anything as ground (or space) breaking as 3D printing in space, but Mind-2-Matter getting to be a REALLY exciting project.

I'm working on the photography tomorrow morning before we head out to Half Moon Bay.

I went through the entire casting process on Saturday from spruing to pouring the investment mold to pouring the pewter! Justin took some video so I will get that posted up tomorrow as well as the photos of Gnorman in various states of being.

Here are a few of Gnorman from my cell phone (the real pictures will happen tomorrow!).
Brain Rot 


I really wanted to keep a golden Gnorman, but he had to go through the polishing stages!


Wednesday, December 4, 2013

The Studious Stag

I know I've been neglecting the blog a bit.

I have been working diligently on projects, especially now that I have a lot more time on my hands. I haven't really settled into a routine since losing my job. I really think that will help. We're going crabbing tomorrow (hopefully a crabfest will be had tomorrow night!) but I would really like to get a good routine down.

In fact, I just finished this piece today:


It's available in our Etsy store and it's a part of a series of 5 pieces I'm working on.

In all honesty, the general crappiness of the eCraft has been the hold up on this and several other projects.

Contacting Craftwell has been of little help other than "you're doing it wrong". I finally found a blogger at Purple Paper Paradise who apparently knows how to use the machine and is WAY more help than Craftwell's customer service.

I was able to get a few usable cuts following her tips, whereas I was still just throwing paper away trying to "do it right" according to Craftwell Customer Service.

Perhaps they need to sit down and watch PurplePaperParadise's videos in order to work in CS? I don't like to be mean to CS people, they're usually doing the best they can with the limited resources and training that they get. I'm more frustrated with companies that offer products with little to no support documentation and you just sort of have to figure out, especially when they purport their product to be easy to use out of the box.

I've got some additional projects on my list, including Christmas cards. I know it's a bit late (a lot of people do their Christmas cards Thanksgiving weekend), but I seriously didn't even think about them until I asked my husband yesterday if he wanted to send any out and if we were going to make them or do a lame photo card.

I hope to have cards ready by the weekend. You can always leave a comment here if you have suggestions. I'm really interested to hear if there are letter press plates that people really want to see made for units like the Fiskar's Fuse or the like. I've got the capacity to help make that a reality and have had it on my radar for a while now. I've asked friends and family if there were any sort of crafting themes they would like to see but none of them want to craft (everyone is into Instagram to apply filters to their photos but no one actually does anything with said photos).

Saturday, November 23, 2013

Mind-2-Matter


You may remember Gnorman from earlier this year.

This was my free sculpture for my figure modeling class during the Spring 2013 semester at AAU.

This may be the piece of work that I am the most proud of ever. EVER. (and I've made a lot of art in the last 30 years). Needless to say I was most saddened when I was too busy to properly finish Gnorman and have him fired (I went straight from work/school to wedding prep/work and he dried out!).

I had been crossing my fingers that we could get him scanned before he was a total loss since June/July. Our method of scanning wasn't the easiest but Justin and I worked through a variety of methods using Kinect cameras for another project and I figured that we would, at some point, rig that set up again.

Well, we didn't have to.


The Gnomes (thanks to the Elder Gnome) have acquired the Sense 3D Scanner.

A few minutes time and we had a model to print. I was so excited I could barely contain myself last night! The original Gnorman is 8" W x 13" D x 24" H. New Gnorman is about 1" W x 1.5" D x 4" H!


So exciting!  

And it was just in time. Gnorman's ear fell off after we finished scan!