Showing posts with label MakeXYZ. Show all posts

Tuesday, February 4, 2014

Hot Trend: Brass, Bronze and Gold Finishes

And we at Mind-2-Matter, know a thing or two about brass.

Currently we are casting brass and pewter with little to no problems. We've also tackled bronze as well!

Brass Impeller

Bronze "Lazard" by Justin Kelly
Brass, bronze and gold tone finishes are all the rage in decorating right now (in moderation I can understand, but it sort of reminds me of the Golden Girls and the 1980's horrid bathroom fixtures when overdone). 

The resurgence in popularity apparently has been building since early 2013. I know that when a former employer would offer vintage brass pieces, they'd sell out almost instantly, but I didn't realize how far reaching it was. House Beautiful called it out in December 2012, Apartment Therapy was singing its praises in 2013 and it seems like the love of brass is still going strong, especially at New House New Home. 

There is certainly a nostalgic bent about brass and bronze. Brass always makes me think of my grandpa. One of his favorite pastimes before his hands got too bad was going to the thrift store and restoring brass pieces. 

The Brass Minimal Surface Cube (above) is an awesome example of what Mind-2-Matter can do. This form is based on theoretical mathematical principles that would be near impossible to bring to reality without 3D printing. Using traditional milling methods, it would be impossible to generate this object in brass, bronze or any other metal. We've developed a technique that has made it a reality. 

The Bronze "Lazard" is another example of bringing digital assets to life. It was originally created as a model for a class Justin took and it's been brought to life using 3D printing. We've then used our process to cast in bronze. This is an amazing took for digital modelers who may want to create a physical object from their digital assets!. 

Got an idea? Contact us. We can help you bring your ideas from mind to metal :)

Tuesday, January 21, 2014

Matter Control Set Up

Okay, I didn't get the video done this morning. But I had a good reason. I had to go over to City Hall in San Leandro and get Mind-2-Matter's business license! I've been trying for a couple of weeks to get over there, but the planning department has wonky hours. They work a full day Monday and 8-12 Tuesday through Thursday and are closed on Fridays. Yesterday was a holiday (and last week I don't think I ended up in San Leandro during business hours), so I got it taken care of today.

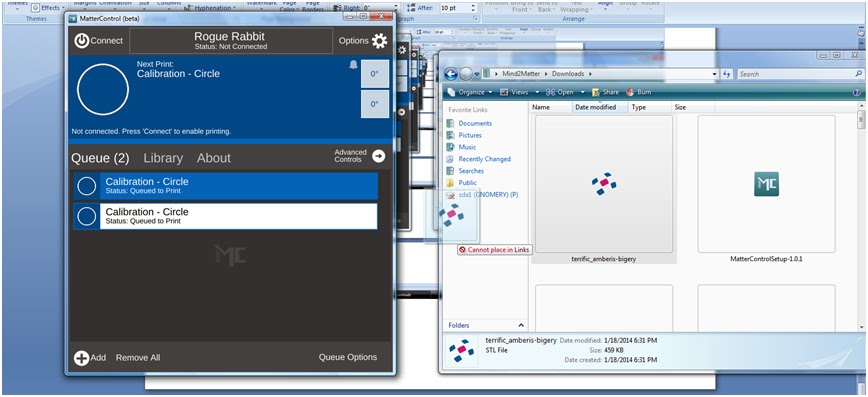
I did get some screen captures done of the set up for Matter Control today. I haven't had a chance to run anything yet (there are never enough printers because we're so busy!), but set up is super easy.

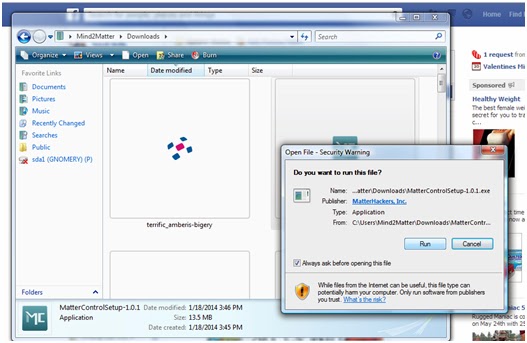
The usual - download the file and run it. 

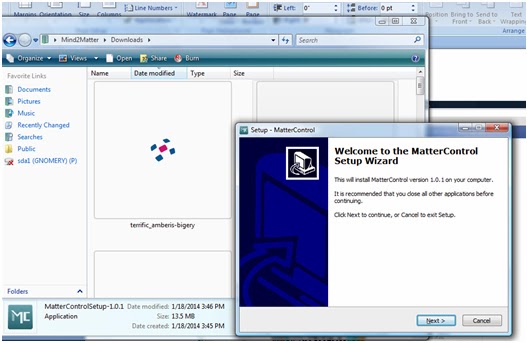
Follow the Setup Wizard (I'm pretty sure you don't need a play by play of this step)
I'm jumping ahead to opening the program in the next step so don't think you missed anything. 
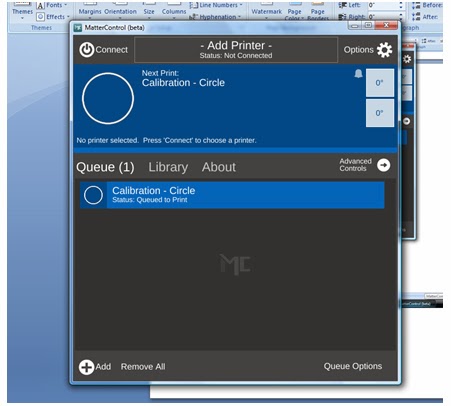
This is the default screen when you open it for the first time. 
This is where you will set up your printer (and where I found out about the Airwolf printers. I want to get my hands on one so I can see if it lives up to such a badass name).

Click on the center where it says "add printer".


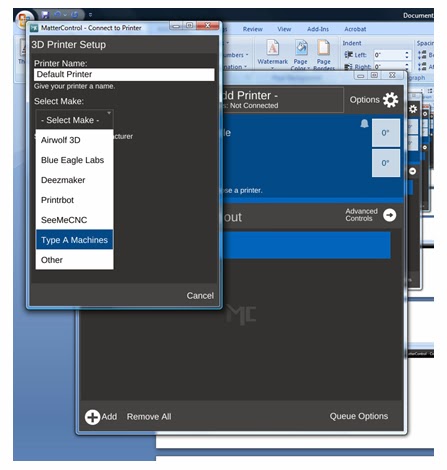
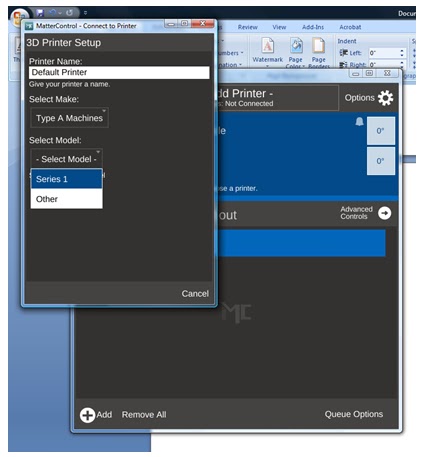
In this screen you can name your printer (really helpful when you have a wall full of printers to try to keep straight) and you are able to select your make and model of printer (which will lead you to the right drivers to install).

They are listed in alphabetical order, but look there's the Airwolf!
Really though, if you want dependability, go with the Type A Machines - We're running 5 right now!
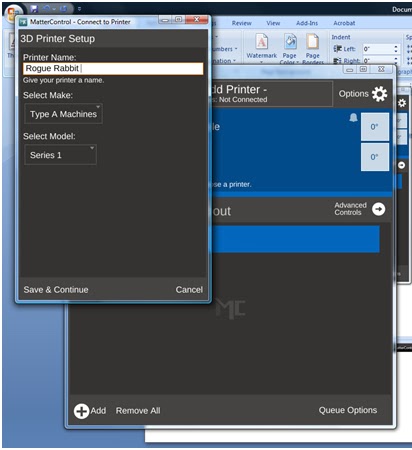
Select your model - We've got the Series 1. 
And choose a name. Obviously - Rogue Rabbit is an appropriate name.
Maybe when we get the Tantillus printers up and running, I will make one named Rogue Rabbit. 
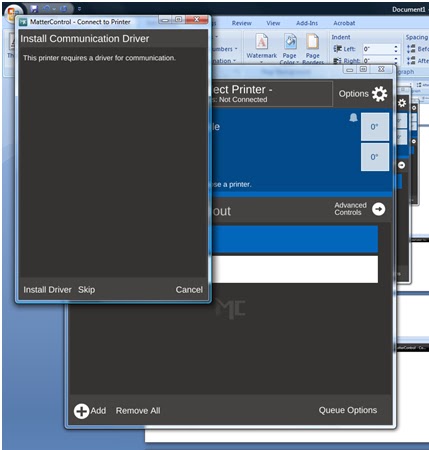
Install your drivers. 
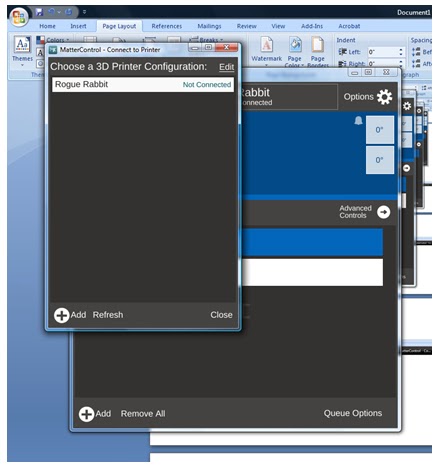
After installing drivers and testing communication, you are ready to choose your printer. 
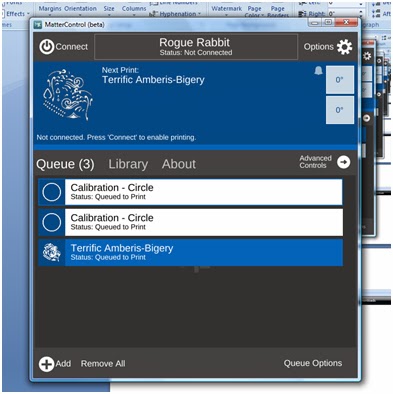
Here's one of the cool parts - Drag and drop file queuing. I've downloaded one of my models from TinkerCAD,
and just dragged it over to my queue.

And here's my file added to the queue. 
I'll try to get my hands on a printer tomorrow to run a print job.

Like I've said, I'm a total novice when it comes to printing. Justin has ALL the printing skillz because he's seriously spent like the entire last year with the printer. He knows the ins and outs better than anyone does of the Type A Machines Series 1. He also knows the hassles of other printer controllers.

I'll play with it and ask his opinion on it as an "expert".

BTW, added a few new pieces of art to our Society6 page, including this awesomeness! I don't even like throw pillows, but I would order one.


Friday, January 10, 2014

Mind-2-Matter - Hard at work!?


This is how hard Pi works at The Gnomery!

I've been trying with ZERO luck to upload this video of what happens at night in The Gnomery. Blogger is a jerk, so it won't embed no matter how I try to upload it, so a link will have to do.

I haven't done a ton of creative work this week, but creative work has been going on in the Gnomery (part of the video above is "testing" the "TactiGnome SlugFire" - a LaserGnomes designed accessory for the NERF SledgeFire blaster).
TactiGnome SlugFire designed and manufactured by LaserGnomes
We're also getting ready to start testing some new materials. We typically print in PLA, but have some PET to test in the near future. Both are environmentally friendly bioplastics, which we use instead of petroleum based plastics like ABS.

It's been a full week of research and paperwork for me, but Mind-2-Matter is almost done with all of that. We have moved to a fantastic space in San Leandro, CA. We're sharing this space with Type A Machines and it's going great.

The City of San Leandro is committed to revitalizing and re-imagining American manufacturing and we are excited to be a part of it. San Leandro has a fiber loop (can't tell you how excited Justin was at the mention of this!), tons of warehouse and commercial space available (the building we are in was formerly a Ford, Chrysler and Caterpillar plant) and they are currently having a "holiday" from business license fees to attract new businesses to the area. This applies to almost any new business setting up shop in San Leandro, which is unheard of.

 As a "start up" company, that is a great incentive. For us, a very small business (3 people currently), the savings don't seem like a ton (about $300), but considering business licence fees are calculated on the number of owners and employees, that can quickly add up. Can't beat free, right?!

Keep an eye out for some of our upcoming projects. We are about ready to start casting in the new facility (we're up to 4 kilns) and we are expanding our 3D printing capabilities.

Here are some of the places you can find our services:

3d Hubs
MakeXYZ
Fictivmade

.


Thursday, January 2, 2014

It Never Stops (and we wouldn't have it any other way)

Oh my damn. So many things to write about.

First of all Happy New Year! I've been slacking but it's been a busy couple of weeks!

LaserGnomes/Mind2Matter is all moved in to our new location in San Leandro with Type A Machines!


Rod, Justin and I!

I totally thought I had more pictures on my phone/camera but I've been so excited to just make things and get set up, I have been slacking on the photos!

I'll get some tomorrow of the nearly completed space.

I do have pictures of some of my projects. I want to test out scanning equipment on sculpture, so I have been working with Sculpture House Prima Plastilina Modeling Clay, Sulphur Free, Light Tan, 2 lb - 2 lb, which is an oil based clay that does not dry out. I've never worked with it before and was sort of worried about the "hardness" of it (I put off model making 1 forever and a day because of the thought of using it). When Justin used it for school, he was warming it in the oven to soften it and then you ran into the issue of it getting too hot and burning your hands.

Well, I discovered the wonders of the heat gun. I've used the heat gun for finishing PLA and doing some welding/shaping work in PLA, so I grabbed it to use on the plastilina. It works wonders! How a heat gun is NOT a part of your materials list for classes that require it is mystery to me!

I definitely needed a break from working with it today, as my hand and arm hurt a lot but Wintergreen Essential Oil. 10 ml. 100% Pure, Undiluted, Therapeutic Grade. has been a lifesaver when it comes to pain caused by over exertion. I have 20:80 dilution mixed up at all times (usually adding wintergreen oil to avocado oil or coconut oil as a carrier) and it works wonders. I even gave some to my mom for her horrible chronic foot pain and she said it helped really quickly.


I had a couple of kids request a fairy sculpture when I went to the Creative Learning Loft Christmas party, but it's turning out to be a bit more elfin than fairy. I'm not one for fairy princesses anyway :)

All I can say is this is a really exciting time and I'm so proud of my husband for keeping at 3D printing even when it was frustrating beyond belief. We had an idea of where we wanted to land, but weren't sure how we were going to get there.

We now have a wonderful creative space and are making money doing what we love. We can even take the Pi to work with us.


We will be having an open house/shop warming party in the near future. Keep an eye out for the info!

BTW - I haven't forgotten about the whole 3D modeling software trials. Between the move and holidays, it's been busy and in all honesty, it's faster for me to bust out the clay. I spent hours trying to figure out how to do fairy garden fence pieces using software and had doors in 3 sizes, a fence and part of an elfin creature done in an 8 hour day.

Friday, December 20, 2013

The Gnomery (Gnome Sweet Gnome)

I haven't forgotten about my reviews of 3D modeling software. I really haven't.

But it's been quite exciting around here nonetheless.

The Gnomery is moving. We picked up keys and started moving furniture in today!


I spent much of yesterday working with ComposiMold, which I had come across at MakerFaire earlier this year. It's a reusable molding compound for making a variety of molds (including 2 part, push molds and more). It comes in a variety of formulations, including FC, or food contact.

I ordered my ComposiMold through Amazon and it arrived in 2 days as Prime Shipping usually does (I say usually because I had one item show up like 5 months later after a replacement had already been sent out).

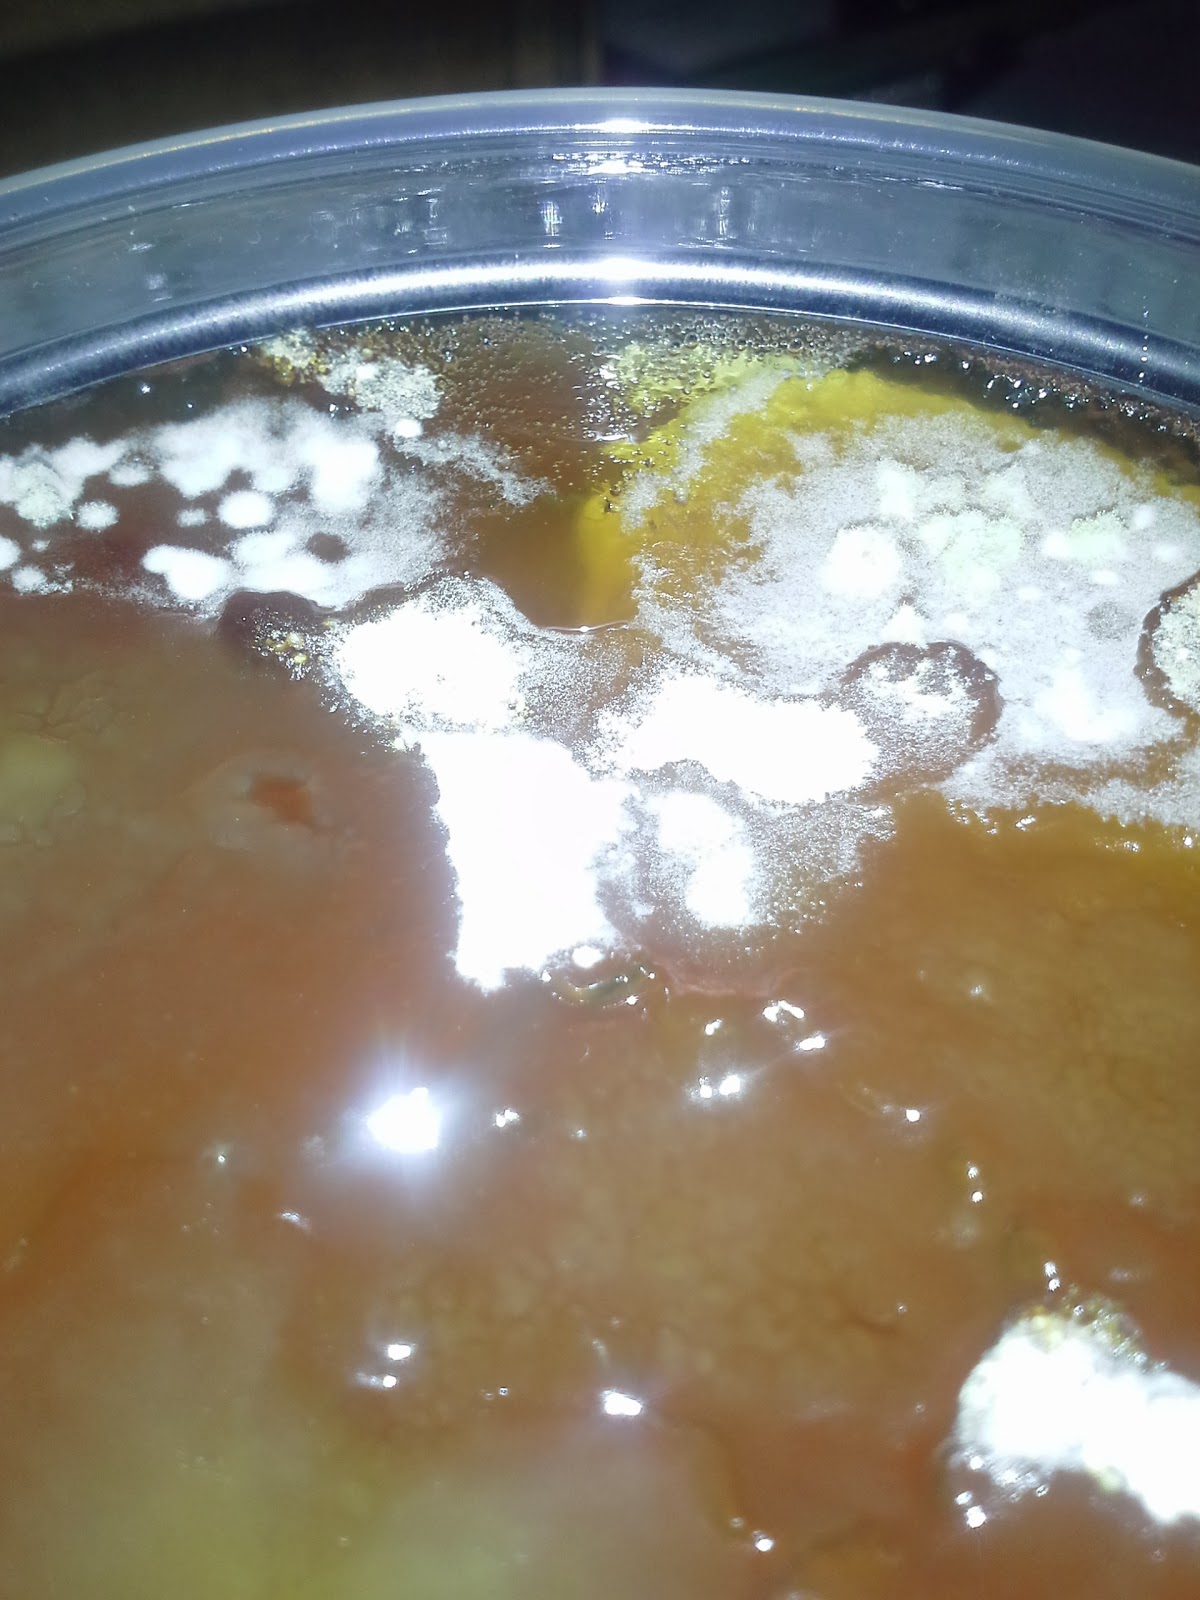
Unfortunately, the top of the container was contaminated with mold!


I was totally bummed and reached out to ComposiMold on Facebook. Granted it was like midnight when I posted the pictures, I didn't really expect anything to happen right away.

Well, when I got up the next morning, I had two responses to my post and a separate email from ComposiMold. They apologized profusely and have issued a replacement AND refunding my original purchase price in order to make things right.

Later in the day, I even received a voicemail from Sean at ComposiMold apologizing for the situation.

Even though my initial experience was less than stellar, they have worked really hard to make it right. It is really rare to find good customer service (let alone any customer service) these days, it was awesome to have a company be so responsive to a problem.

I can't post any pictures of the project since it's Christmas and all (don't want to give away the goods!). I'll post pictures once I've given the gifts.

We picked up some furniture from Moving Sale (our local second hand shop), including a super sweet whiteboard set up! Unfortunately, it was about 5 pm when Rod got into town with the kiln hoods so traffic was horrendous getting out of the city. I think it took more than an hour to get there (The ride home took less than 20 minutes without traffic).

Justin opening the door with our key for the first time!

Our spot. The room is about 8k sqft and we have an area about 18' x 34' with room for expansion.
I can't tell you how exciting this is. A year ago, we were getting our 3D printer. We had a dream to put it to work for us. We didn't know how we were going to do it, but that was the plan. We've had our ups and downs with the printer itself. In fact, take a look at my first post, Type A Machines Series 1, it was quite the learning experience.

A photo from my first blog post about 3D printing. Our failed print graveyard. It got larger, much larger over the last year. 

Today we are setting up our future. We had an idea and we've stuck it out. We have gone from the above results to print on demand fulfillment, including 3D scanning and metal casting. Some didn't have faith in our dream but we did and now it is paying off. My husband's perseverance through this project has been nothing short of amaze (and yes, I meant to type amaze).

Sometimes it has been nerve wracking. My poor husband stays up all night working. I have felt tremendous guilt for being busy with an outside job and school, but we've pressed on. Big things are happening and I'm filled with gratitude to be a part of it.


Thursday, December 12, 2013

3D Sculpting Software - Curvy 3D - Day 2

I'm still playing around with Curvy3D. I am going to work with Justin to try to come up with good evaluation tools from his standpoint (i.e., how the models will work for printing, etc.) to try to evaluate if the program works for our overarching needs, not just my desire to make organic shapes (really, what good is the model going to be if it doesn't print?!).

The other project I was working on was the Rufio costume for a friend. A friend approached me yesterday afternoon with the need for a Rufio costume for a party that started at 4 pm today! 

Not sure who Rufio is? A character from 1991's Hook. A bit random, right? Especially for a Christmas party. 


Here's the result:


I altered the jacket and made the necklace, including the beads. 

Not bad for such a quick turnaround. 

So with that taking up a bit of time (but amazingly not as much as I expected), I played around with Curvy3D. 

Keep in mind, my area of design is 2D. I'm great with Illustrator, Photoshop, etc. I have the hang of TinkerCAD as far as 3D goes, but I am, by no means experienced in 3D modeling. I have played a bit with Inventor (Autodesk) and AutoCAD (Autodesk). 

I really want a program that I can pick up my stylus and "draw". I played a bit with Sculptris but didn't really "get it" super quick (I will return to it after playing with Curvy3D). 

Here's my first attempt at really playing around with it doing more than just "what does this icon do?"

As you can see, I watch a lot of Ancient Aliens
Is this what our alien overlords will look like?


So this was created using some basic tools including "Create Cylinder", "Pull Tubes", "Add", "Sub" and "Smooth". 

I didn't really have a plan and wasn't entirely certain what I was doing, I sort of started "pushing" and "pulling" the clay and playing around with it. 

I've exported it as an .obj file so Justin can evaluate it's usefulness in 3D printing. He's currently working on a 3D printed trailer for a trailer park (the things people want), so I'll probably have a better idea as to the immediate usability of the model tomorrow. 

On an aside, I'm not exactly sure when my entire Pinterest feed began getting flooded with fashion and mens grooming products (pretty sure the grooming products being as hipstery as they are are courtesy of Shoppe Mob). I've got to start following some better boards. 

Any suggestions?

3D Sculpting Software - Curvy 3D

I'm trying to find a 3D modeling software that is relatively easy for a beginner to navigate. 

Everyone knows how much I love TinkerCAD but for a lot of what I want to do, it can't create organic shapes. You can only do so much creating .svgs in Illustrator and importing into TinkerCAD. I can't chamfer or bevel, I can't create fillets. 

I can use Autodesk's Inventor or AutoCAD but I really want to work organically. My other thought was to sculpt everything by hand and use the Sense 3D scanner to create models, but really, I should learn how to model digitally. 

I don't have the education that Justin has (and that is why he has an INTENSE understanding of models) and don't necessarily need to. But I need to be able to create organic designs digitally. I need to be able to do more than extrude an .svg file and print that (really, I could just be using a laser cutter, which is much faster and I could work in a variety of materials for that). 

To truly take advantage of what we are building, I need to model. 

I'm trying a bunch of programs out, either freeware or on trial basis, in the next few weeks to see how I feel about them and try to judge their ease of use. I want to find a program that a novice could play around with and not be frustrated. 

Enter Curvy3D. I'm going to play with it for at least a week. I started playing around with it today, but got a request to help make a Rufio costume by tomorrow. So I took the opportunity to carve some dragon's teeth for a necklace, make a mold and create custom beads for it. We also do some low tech manufacturing here was well. It's not always lasers and PLA :)

Clay "dragon tooth" (left) and inverse mold (right)
The beads are in the oven and will be assembled in the morning. 

Just in case you don't remember Rufio, here's a photo


I didn't really get far enough into Curvy3D start getting into the nitty gritty, but it allows me to start doing what I had planned for in my designs. There is a 30 day free trial (that's how I'm checking it out) and the normal cost is $99.00. It is currently discounted 25% for a sale price of $74.25. That's not bad considering the intense investment most other software entails. 

I plan do to some screen captures and possibly some videos while I'm playing around with it, which I will share here. Some others I am checking out will be Wings3D, Sculptris and Modo. 123D Sculpt (autodesk product) is, unfortunately, iPad only. So that's not going to be in the running.

Wednesday, December 4, 2013

The Studious Stag

I know I've been neglecting the blog a bit.

I have been working diligently on projects, especially now that I have a lot more time on my hands. I haven't really settled into a routine since losing my job. I really think that will help. We're going crabbing tomorrow (hopefully a crabfest will be had tomorrow night!) but I would really like to get a good routine down.

In fact, I just finished this piece today:


It's available in our Etsy store and it's a part of a series of 5 pieces I'm working on.

In all honesty, the general crappiness of the eCraft has been the hold up on this and several other projects.

Contacting Craftwell has been of little help other than "you're doing it wrong". I finally found a blogger at Purple Paper Paradise who apparently knows how to use the machine and is WAY more help than Craftwell's customer service.

I was able to get a few usable cuts following her tips, whereas I was still just throwing paper away trying to "do it right" according to Craftwell Customer Service.

Perhaps they need to sit down and watch PurplePaperParadise's videos in order to work in CS? I don't like to be mean to CS people, they're usually doing the best they can with the limited resources and training that they get. I'm more frustrated with companies that offer products with little to no support documentation and you just sort of have to figure out, especially when they purport their product to be easy to use out of the box.

I've got some additional projects on my list, including Christmas cards. I know it's a bit late (a lot of people do their Christmas cards Thanksgiving weekend), but I seriously didn't even think about them until I asked my husband yesterday if he wanted to send any out and if we were going to make them or do a lame photo card.

I hope to have cards ready by the weekend. You can always leave a comment here if you have suggestions. I'm really interested to hear if there are letter press plates that people really want to see made for units like the Fiskar's Fuse or the like. I've got the capacity to help make that a reality and have had it on my radar for a while now. I've asked friends and family if there were any sort of crafting themes they would like to see but none of them want to craft (everyone is into Instagram to apply filters to their photos but no one actually does anything with said photos).

Saturday, November 23, 2013

Mind-2-Matter


You may remember Gnorman from earlier this year.

This was my free sculpture for my figure modeling class during the Spring 2013 semester at AAU.

This may be the piece of work that I am the most proud of ever. EVER. (and I've made a lot of art in the last 30 years). Needless to say I was most saddened when I was too busy to properly finish Gnorman and have him fired (I went straight from work/school to wedding prep/work and he dried out!).

I had been crossing my fingers that we could get him scanned before he was a total loss since June/July. Our method of scanning wasn't the easiest but Justin and I worked through a variety of methods using Kinect cameras for another project and I figured that we would, at some point, rig that set up again.

Well, we didn't have to.


The Gnomes (thanks to the Elder Gnome) have acquired the Sense 3D Scanner.

A few minutes time and we had a model to print. I was so excited I could barely contain myself last night! The original Gnorman is 8" W x 13" D x 24" H. New Gnorman is about 1" W x 1.5" D x 4" H!


So exciting!  

And it was just in time. Gnorman's ear fell off after we finished scan!


Saturday, August 3, 2013

It's awesome.

When you have an idea and make it happen.

Having a 3D printer makes it even more awesome because it can happen in a matter of hours.

We use a GoPro to create time lapse videos of our 3D prints here in The Gnomery. Well, it wasn't the most perfect set up having it sit on the edge of the glass we use as our print bed. It vibrated. It wiggled. It was unstable.

Justin had an idea. He decided to make a GoPro mount that fits on the printer itself.

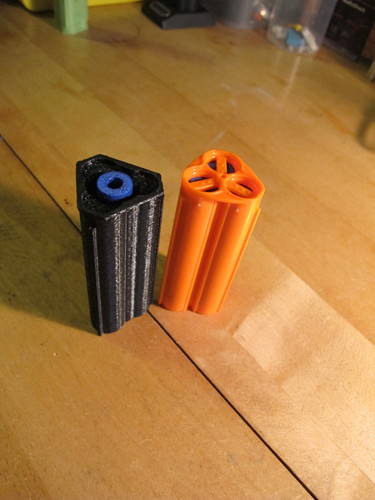
Even better, he decided to combine that mount with the filament guide he had previously printed.

To TinkerCAD he went. To the Community Garden meeting I went. By the time I was back, he was done with the design and printing had commenced.

Here's the finished product.


Seriously. It's amazing to have the capability of idea to object in an afternoon.

If you don't have a 3D printer, it's definitely affordable to work with the LaserGnomes to get an idea rolling.